How to Install ZXing in Eclipse (JavaSE Component Only)
Update: Apparently I had a serious concussion when I wrote this, as I completely overlooked the obvious. "Hello, McFly - svn? I hear Google code has it too." So do not bother using these instructions. It is much simpler pull the project from SVN.
When I researched the JavaSE component of ZXing, I compiled the jars I needed with Eclipse 3.4.1 . The set up was relatively simple. But there were several steps needed to get everything up and running properly. So I decided to write up a quick set of instructions.
Note: ZXing contains several components (javase, javame, servlet, android, etcetera). These instructions only cover the JavaSE component. You may notice I imported the full source. But to actually use the other components in the project, additional files are needed. For further instructions see the project's Getting Started section
Instructions
1. Download the latest source and extract the files.
As of this entry, the current version is ZXing-1.4.zip. (Your version may differ.)
2. Create a new project in Eclipse.
- Use whatever you project name you wish. Example: "ZXing"
- Make sure the project JVM is 1.5 or higher
3. Import the source files into the project
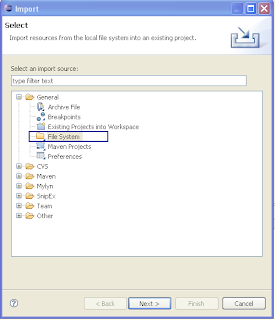
- Select File => Import => File System => Next
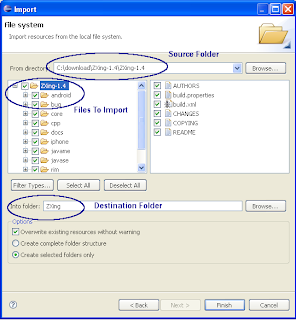
- Supply the source and destination

1. Navigate to the extracted files and select the ZXing-1.4 subfolder . 2. In the main window, check the ZXing-1.4 folder, so its contents are imported 3. Select the top level folder of your project (not "src") for Into Folder

- Make sure Create selected folders only is selected
- Finally, click Finish to import the files into the project
4. Next Configure the Build Path
After the source files are imported, you need to configure the project build path. Each sub-component in ZXing has its own separate src folder. Each of them must be added to the build path. ZXing also has a few jar dependencies. Those jars must be added to the project build path as well.
You could modify the path using Eclipse's "Configure Build Path" option. But a shortcut
is to modify the project's .classpath file manually.
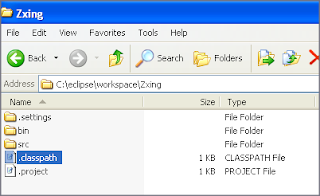
- Find and open the project's .classpath file
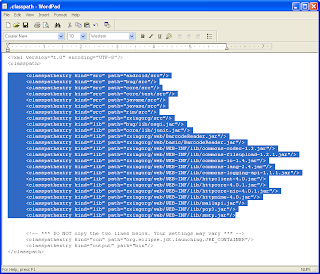
- Paste in the new class path entries below and save the file.
- Close and re-open the project in Eclipse to apply the changes.
New Class Path Entries
<classpathentry kind="src" path="android/src"/>
<classpathentry kind="src" path="bug/src"/>
<classpathentry kind="src" path="core/src"/>
<classpathentry kind="src" path="core/test/src"/>
<classpathentry kind="src" path="javame/src"/>
<classpathentry kind="src" path="javase/src"/>
<classpathentry kind="src" path="rim/src"/>
<classpathentry kind="src" path="zxingorg/src"/>
<classpathentry kind="lib" path="bug/lib/osgi.jar"/>
<classpathentry kind="lib" path="core/lib/junit.jar"/>
<classpathentry kind="lib" path="zxingorg/web/BarcodeReader.jar"/>
<classpathentry kind="lib" path="zxingorg/web/basic/BarcodeReader.jar"/>
<classpathentry kind="lib" path="zxingorg/web/WEB-INF/lib/commons-codec-1.3.jar"/>
<classpathentry kind="lib" path="zxingorg/web/WEB-INF/lib/commons-fileupload-1.2.1.jar"/>
<classpathentry kind="lib" path="zxingorg/web/WEB-INF/lib/commons-io-1.4.jar"/>
<classpathentry kind="lib" path="zxingorg/web/WEB-INF/lib/commons-lang-2.4.jar"/>
<classpathentry kind="lib" path="zxingorg/web/WEB-INF/lib/commons-logging-api-1.1.1.jar"/>
<classpathentry kind="lib" path="zxingorg/web/WEB-INF/lib/httpclient-4.0.jar"/>
<classpathentry kind="lib" path="zxingorg/web/WEB-INF/lib/httpcore-4.0.1.jar"/>
<classpathentry kind="lib" path="zxingorg/web/WEB-INF/lib/httpcore-nio-4.0.1.jar"/>
<classpathentry kind="lib" path="zxingorg/web/WEB-INF/lib/httpmime-4.0.jar"/>
<classpathentry kind="lib" path="zxingorg/web/WEB-INF/lib/mailapi.jar"/>
<classpathentry kind="lib" path="zxingorg/web/WEB-INF/lib/pop3.jar"/>
<classpathentry kind="lib" path="zxingorg/web/WEB-INF/lib/smtp.jar"/>
.ClassPath File

.ClassPath File Contents

You should now be able to run both the core an javase components of the project from Eclipse
Building Jars
The project includes several ant build files to simplify the process of building jars. Again, each component subfolder contains its own separate build file. So you can easily build jars individually. Simply locate the build.xml file for the desired component. Then run the build task to generate the jar.
Example: To build the JavaSE Jar
- Locate the javase/build.xml file
- Run the build task in ant
- Ant will generate a javase.jar file inside the javase/ folder


3 comments:
Thank you for posting this informative tutorial. It really helped me out. I am still somewhat of a noob though and was wondering if you could explain in more depth the last task of building jars. When you say "run the build task in ant" is that something that can be done from within eclipse?? If not how do I go about doing that??
Hi @Garrett,
Yes, you run it from within Eclipse. All you need is the Ant plugin. IIRC, most recent versions of Eclipse should include Ant as a standard plugin. So you may have it installed already. Assuming it is ..
The simplest way to build the jar is to find the desired "build.xml" file and just right click it. Then select [Run As => Ant Build]. That is it. As the jar builds you will several messages appear in the [Console] tab. or an error if something went wrong:
Buildfile: C:\pathTo\Zxing\core\build.xml
clean:
[delete] Deleting directory C:\pathTo\Zxing\core\build
build:
.... etcetera ...
BUILD SUCCESSFUL
Total time: 9 seconds
You can also use the Ant View [ Window => Show View => Ant ]. But the method above is the simplest.
(BTW: Definitely use svn to set up the project in Eclipse. I did not do that the first time around .. Needless to say using svn was much easier ;-)
-Leigh
Awesome. Thanks for the quick reply!
Post a Comment